Background
jLogo Programming
- Commanding a Turtle
- Pseudocode
- Adding New Commands
- Iteration & Animation
- Hierarchical Structure
- Procedure Inputs
- Operators & Expressions
- Defining Operators
- Words & Sentences
- User Interface Events
- What If? (Predicates)
- Recursion
- Local Variables
- Global Variables
- Word/Sentence Iteration
- Mastermind Project
- Turtles As Actors
- Arrays
- File Input/Output
- AI: Pitcher Problem Solver
Java
- A Java Program
- What's a Class?
- Extending Existing Classes
- Types
- Turtle Graphics
- Control Flow
- User Interface Events
Appendices
- Jargon
- What Is TG?
- TG Directives
- jLogo Primitives
- TG Editor
- Java Tables
- Example Programs
- *** New ***:
Installation Notes
Updates
- December 13, 2008
- January 6, 2012
- March 15, 2013
- January 20, 2014
- February 13, 2014
- July 29, 2014
- January 18, 2016
- January 29, 2016
- August 19, 2016
Lastly
Turtles As Actors
Introduction
Time for exploration of advanced animation. I gave you a taste of it in the lesson where I covered iteration. There was animation involved in the Eyes Project when we were exploring user-interface events. These were interesting, but simple, examples of animation. All you were really doing was drawing something, erasing it (or part of it), changing something like the turtle's position, and then redrawing. Did you ever wonder why the motion wouldn't always be smooth when you were doing animation this way, why sometimes you would see jerky updating?
Simple animation is pretty easy. But, when you want to get a complex object moving in an intricate manner or many objects moving about, smooth display updating is hard to achieve without some advanced techniques.
In this lesson, you will learn how to change a turtle's image and use the turtle itself as an animated object. This eliminates much of the drawing your programs now perform. You will also learn how to use multiple instances of the turtle to do multiple things in parallel. This can be a lot of fun, but a challenge at times...
Demonstration: A Falling Ball
The ability to write your own computer programs is incredibly valuable when you are investigating or learning something new. Your computer can play the role of a tool which you can use to express what you are thinking; you can create a model. To demonstrate what I mean, lets work through a program that visualizes a falling ball.
So, given what you've learned so far, you could go about writing a simulation of a falling ball by instructing the turtle to:
- draw a circle filled with some color other than the background color (say red),
- wait a little bit,
- redraw the ball in the same color as the background,
- move the turtle down a little, and
- repeat steps 1-4 ...
What if you could get the turtle to change its shape, take on a costume? If the turtle could be transformed such that it looks like a ball, your instructions would be greatly simplified, your algorithm becomes:
- wait a little bit,
- move the turtle down a little, and
- repeat steps 1-2 ...
This alternative approach provides much faster graphics. There is no drawing, erasing, drawing, erasing... (which requires a lot of computation), just a box of pixels internal to the jLogo interpreter that are moved around over top of the graphics canvas.
But... although the instructions we need to write appear to be simpler than when we do all the drawing, there is a little more complexity than you'd think.
In all of the programs written so far, the turtle has just been a painter for us. We would instruct it to do stuff for us, mainly paint. One of the first things we would do in our main procedure would be to make it invisible with the HIDETURTLE command. So the turtle would go about doing whatever we asked, but out of view.
With the new approach, we are asking the turtle to be part of our program - it is taking on the role of an actor! So, in addition to instructing it how/what to paint, we will also need to instruct it to act the way we want.
Let me explain better (in more detail) by showing you part of the FallingBalls program. Here are the procedures that contain instructions related to the use of the turtle acting as a falling ball.
   ; simulate ball falling
   ; :time input is the amount of time in seconds since ball started falling
   to dropBall :time
     if less? ycor endBallY [wait 1000 stop]
     sety difference startBallY (simulatedDistanceFallen :time)
     wait timeDelay
     dropBall (sum :time simulatedTimeInterval)
     end

   ; Event Handler for mouse click
   to mouseClicked
     if mouseInRect? chkboxX constantVelocityChkboxY chkboxSize chkboxSize [setConstantVelocityCheckbox]
     if mouseInRect? chkboxX gravityAcceleratedChkboxY chkboxSize chkboxSize [setGravityAcceleratedCheckbox]
     if mouseInRect? buttonX dropButtonY buttonHeight buttonWidth [dropBall 0]
     penup setxy ballX startBallY setpencolor red showturtle
     end

   to main
     hideturtle home clean
     setshape (sentence ball ballDiameter)
     drawButtonAt buttonX dropButtonY "|Drop Ball|
     drawCheckboxAt checkboxX constantVelocityCheckboxY "|Constant Velocity|
     drawCheckboxAt checkboxX gravityAcceleratedCheckboxY "|Gravity Accelerated|
     setConstantVelocityCheckbox
     penup setxy ballX startBallY setpencolor red showturtle
     end
|
I'm going to cover the procedures in the order in which TG performs them, starting with main. The first instruction in main is new; SETSHAPE is the instruction that changes the turtle's shape, its image, its pixel values. Table 18.1 contains documentation for SETSHAPE, copied from Appendix C (Primitive Procedures).
| Name | Input(s) | Description | |||||||||||||||||||||
| SETSHAPE SETSH |
number |
Sets the turtle's image to a specified shape. Shape is expressed as
a number. The built-in shapes are:
|
|||||||||||||||||||||
| SETSHAPE SETSH |
number-sentence |
Sets the turtle's image to a specified shape and size. The first number in
the sentence is the shape number; subsequent numbers specify a preferred size,
which is shape dependent. The available shapes and their size parameters are:
|
|||||||||||||||||||||
| |
|||||||||||||||||||||||
SETSHAPE comes in two flavors, both with a single input. One flavor expects a number for the input, a shape number. The other flavor expects its input to be a sentence consisting of numbers. The single number flavor just uses a default size for the shape. In our code, SETSHAPE is used with a number-sentence as its input because I want a larger ball than the default size. I build the number-sentence using the SENTENCE operator, giving it two procedures (symbolic constants) as inputs. So... after this instruction is performed the turtle appears to be a medium-sized ball.
Following the SETSHAPE instruction, the next five lines of instructions in main initialize the program. We get the turtle to clear the graphics canvas and then paint a button and a couple of checkboxes; finally we fill in the default checkbox.
The last line of instructions is unique to using the turtle itself as a participant in our program. Why?
Well, since we've had the turtle doing some painting, we don't know where it is... we don't know what color it is... we do not know if the pen is in the down position or the up position... The turtle is also invisible - we performed our traditional HIDETURTLE command before all of the painting (to speed painting up).
The last line of instructions in main sets the state of the turtle (which is wearing its ball costume) such that it's ready to participate in the program. We don't want it painting so we lift the pen. Then we position it at the top of the graphics canvas, set its color to red, and make it visible. It's now ready to act for us.
With main complete, our program waits for the user to click the mouse on the "Drop Ball" button or one of the checkboxes. When the mouse is clicked, our mouseClicked procedure will be performed. The first three lines of its body are similar to the other GUI-driven programs we've written, but the last line is new and needed since we want to make sure the turtle is ready to act again.
We do not know if any of the first three lines/instructions (IF commands) resulted in getting the turtle to do something that changed its state. So, no matter what, we want the turtle back at the top of the graphics canvas, with the pen up and colored red, and visible. If you look closely, you'll notice that this last line of mouseClicked is the same as the last line of main.
So, what's left? Just the code that moves the turtle (in its ball costume) as it falls, which happens when the user clicks on the "Drop Ball" button. This is performed in the dropBall procedure, the second line in its body
sety difference startBallY (simulatedDistanceFallen :time)
That's all there is to it... We just change the turtle's Y coordinate! The Y coordinate is simply it's starting point minus the distance it has fallen up to this point in the simulation. When you move the turtle like this, it appears to be a ball falling.
Following is my full program provided as an applet so that you can check it out. Drag the Editor and then CommandCenter name stripes down to their lowest points and play with the model. When the "Constant Velocity" checkbox is selected, the ball falls at a constant rate. If you click on the "Gravity Accelerated" checkbox you'll see the simulation of a ball falling as it would here on Earth.
Finally... explore the program!
*Hint* If you want to see the computation behind the program, try using the TRACE directive to watch the simulateDistanceFallen procedure. Its input is the simulated time since the ball was dropped and its output is the distance it would travel for the given time.
Multiple Turtles
One of the things that we keep trying to do is reduce the complexity of the programs we write. In the previous section, we had extra complexity because we had to get the turtle to do multiple things; it painted the display, it received mouse click events and did what needed to be done, and it showed itself in a ball costume and moved appropriately. It would be nice if we had multiple turtles to specialize, each expected to do only one thing.
Well... you can have multiple turtles! A little bit of complexity comes with this feature which is why I've delayed introducing it. But, now we have a legitimate need for multiple turtles, so let's see how they work.
| Name | Input(s) | Description |
| NEWTURTLE | name | Creates a new turtle with the specified name. The new turtle appears in the home position with its pen down. |
| TELL | name instructionList |
Tells the turtle named name to perform the instructionList. |
| |
||
Table 18.2 shows the new commands we'll use to create and work with multiple turtles. Let's play with them a bit to get a feel for how they work. Use the TurtleGraphics application (TG) or go back up to the TG applet included in the FallingBalls program.
Type the following three command definitions into the Editor. They instruct the turtle to walk around in a circle some number of times at different speeds.
    to c1
      repeat 72 [ forward 10 right 10 wait 1800 ]
      end
    to c2
      repeat 144 [ forward 10 left 10 wait 900 ]
      end
    to c3
      repeat 216 [ forward 10 right 10 wait 600 ]
      end
Then switch focus to the CommandCenter and enter the following commands.
    newturtle "t2
    tell "t2 [setpencolor 1]
    newturtle "t3
    tell "t3 [setpencolor 4 setheading 90]
    tell "t3 [c3]
    tell "t2 [c2]
    c1
You should end up with three turtles going round in circles.
A Falling Ball With Multiple Turtles
Now let's modify the FallingBalls program to use these commands. We'll use NEWTURTLE to create a turtle that becomes the ball. The initial turtle, who's name is t1 by the way, will be the boss and the painter. T1 will get ball to do what we want using the TELL command.
So the first thing we have to do is declare an additional turtle. Since this turtle will be available anywhere in your program, you should put the declaration at the top of your program text. I always declare additional turtles just below the global variable declarations, just above the definition of symbolic constants. Here is the additional lines to add to our program.
; Additional Turtle Declarations ; ------------------------------ newturtle "ball |
Next we need to find all the places where we instruct the turtle to become the ball and instruct it to move about. Since we've just written this code and talked about the changes in the previous section, we only need to work with the same three procedures: main, mouseClicked, and dropBall.
   ; simulate ball falling
   ; :time input is the amount of time in seconds since ball started falling
   to dropBall :time
     if less? ycor endBallY [wait 1000 sety startBallY stop]
     sety difference startBallY (simulatedDistanceFallen :time)
     wait timeDelay
     dropBall (sum :time simulatedTimeInterval)
     end

   ; Event Handler for mouse click
   to mouseClicked
     if mouseInRect? chkboxX constantVelocityChkboxY chkboxSize chkboxSize [setConstantVelocityCheckbox]
     if mouseInRect? chkboxX gravityAcceleratedChkboxY chkboxSize chkboxSize [setGravityAcceleratedCheckbox]
     if mouseInRect? buttonX dropButtonY buttonHeight buttonWidth [tell "ball [dropBall 0]]
     end

   to main
     hideturtle home clean
     tell "ball [hideturtle setshape (sentence ball ballDiameter) setpencolor red penup]
     drawButtonAt buttonX dropButtonY "|Drop Ball|
     drawCheckboxAt checkboxX constantVelocityCheckboxY "|Constant Velocity|
     drawCheckboxAt checkboxX gravityAcceleratedCheckboxY "|Gravity Accelerated|
     setConstantVelocityCheckbox
     tell "ball [setxy ballX startBallY showturtle]
     end
|
Exercise: Turtles Acting as Eyes
Modify the Eyes program that you wrote back in the User Interface Events lesson using multiple turtles. Each pupil should be a turtle acting as such. Let turtle T1 run the show by commanding the pupils what to do as events come in (as your program's mouseMoved procedure is invoked).
Exercise: Racquetball
While we are working with turtles acting as balls, try writing an application that plays Racquetball. Try out the following applet which lets you move a paddle left and right with the arrow keys. in this case you will have one turtle acting as a ball, another turtle acting as the paddle, and T1 doing what it does best - commanding her friends about...
Project: Frogger

Writing Frogger
------- -------

1. Wasted a lot of time finding images I want to use from the
   net, lot's of clip art sites suggested by Google.

2. More time getting the images I chose into .bmp format with
   all edge pixels that I want to be transparent painted white.

3. Start coding.  Draw a 4-lane road with a shoulder on each
   side.  Pick the lane width - based on the sizes of the images
   I need about 70 pixels.  Type in a bunch of symbolic constants.
   Write a procedure that paints the road.

4. Add four new turtles (frog, redCar, yellowCar, truck), load
   and set their shapes.

5. Get turtle hopping. Define more symbolic constants for the
   arrow keys.  Write a keyPressed procedure to move frog up,
   down, right, and left.  Each time an arrow key is pressed,
   the frog hops 70 turtle-steps.

6. Write code to get all of the vehicles in motion.  This ended
   up being more symbolic constants and a few procedures:

   vehicleTripRightLeft :vehicle :speed :lane
   vehicleTripLeftRight :vehicle :speed :lane
   getVehiclesMoving

Ok, now the easy stuff is done.  With what I have so far, there
is no code to detect when one object occupies the same space as
another, i.e., when a vehicle runs over the frog or when faster
moving vehicles go through slower vehicles.  Since these objects
have no senses, they can not see or feel collisions.  There is
no physics in the computer ruling object behavior.

Detecting overlapping turtle images is not simple.  Why?

A turtle's shape has height and width dimensions. These can
be obtained with the SHAPEHEIGHT and SHAPEWIDTH operators. But
these are maximum values and really can only be used if the
shape is rectangular.  Think about a ball.  It's height and
width only represent the size of the ball at it's center. When
a turtle's shape is initialized, all white pixels from the edges
of its pixrect inward to the first non-white pixel become
transparent.

Even when the rectangles encompassing two balls overlap, the
overlapping pixels may be transparent pixels, do the balls
really overlap? No.

Computing whether or not visible pixels of two turtle shapes
overlap is going to take a lot of compute time.  If done, it
would have to be done in TG, a new jLogo operator would need
to be written.  Interpretted jLogo source code would be too
slow to be acceptable.

We need some way for one of our turtles to get the size and
position of any other turtle. One way would be for each turtle
to ASK the another about its shape's size and its location.
Another approach would be for each turtle to maintain a global
variable with its size and location information in it.  Each
turtle could look at the contents of the other turtles'
variables.

Either way, I need to write an operator that takes descriptions
of two rectangles as inputs and outputs a boolean value, true if
the rectangles overlap, otherwise false.  I decided to write a
small program that will also need this operator so that I can
be sure it works properly in a less complex environment. I wrote
a program where one turtle chases another.
Project: SpaceWar
| SpaceWar Applet |
Use the left- and right-arrow keys to move the cannon (the equilateral triangle) and the up-arrow key to fire.
Animate a Projectile
Start entering this lesson's program; I called my program SpaceWar.tt. First write a procedure named tracer which has two inputs: an x coordinate and a y coordinate which are the starting point for the projectile. It should animate a box moving from x,y up and off the visible graphics area.
If you are having trouble, review the animation part of the lesson on iteration.
Responding to Keyboard Events - the keyPressed Procedure
Review the section describing the keyPressed event in the User Interface Events lesson if you need to. Basically, when a key on the keyboard is pressed, if your program contains a procedure with the name keyPressed that has one input, it will be performed.
Start the TG programming environment and type in the following definition of keyPressed.
    to keyPressed :num
      if equal? :num 65538 [ println "left-arrow stop ]
      if equal? :num 65539 [ println "right-arrow stop ]
      println :num
      end
Once you have this entered, remember to click the mouse in the graphics window, and then try out the left- and right-arrow keys. What happens when you press the up- and down-arrow keys?
Combining keyPressed Events and Animation
Back to the program we are writing for this lesson - use keyPressed events to move an object (the cannon) right/left across the graphics window. An equilateral triangle is easy to draw. Using the midpoint of the base as the current point, draw a triangle that's 20 turtle-steps on all sides.
Now, write a keyPressed procedure that moves the triangle left 5 or 10 turtlesteps when the left-arrow is pressed. Once you have this working, enhance keyPressed to move the triangle to the right each time the right-arrow key is pressed.
Finally, add an invocation of the tracer procedure you wrote earlier in this lesson. Change keyPressed so that when the up-arrow key is pressed, a projectile appears to come from the tip of your triangle and travels off the top of the graphics window.
The Turtle Can Only Do One Thing at a Time
So, you got everything I've asked you to do working. There's a very annoying thing that happens... When you press the up-arrow key and a projectile works its way up the graphics window, you can no longer move the triangle. The problem is that the turtle can only do one thing at a time - and it's in a loop in tracer:
repeat quotient :distance 10 [ fd 10 wait 200 setc 7 bk 10 fd 10 setc 4 ]
Not until
- the repeat command completes, at which point
- tracer is complete, and execution of instructions continues back in
- keyPressed, which also is now complete,
will the program be ready to accept another key event. Well, this problem is certainly an annoyance. But worse, our next step is to animate a target across the graphics window. If we animate the target the same way as we did the projectile, we have a real serious problem - the projectile will not move until the target is done moving!
What we need is multiple turtles that each do things independently.
Exercise:
Back to this lesson's SpaceWar program. Create a new turtle in your program to drive the projectile. Please name it "p1" (which is the name I gave mine), an abbreviation for projectile-1. When the up-arrow key event is handled, have this new turtle invoke your tracer procedure.
Communicating Between Turtles
So, there was one tricky thing you needed to do in the last exercise - how did you tell tracer where is should start? In other words, how did you pass it the x,y position of the top tip of the triangle?
If you tried:
tell "p1 [ tracer xcor ycor ]
it didn't work! No matter where the cannon (the triangle) was moved
to, the first projectile would start at 0,0. The reason is that the
xcor and ycor operations return the current location of the
current turtle - the projectile turtle ("p1") - NOT the turtle that's the
cannon ("t1").
What you need to do is use global variables to pass information from one turtle to another. Here is what I did in my fireCannon procedure (my keyevent procedure invokes fireCannon when it gets an up-arrow event, see Figure 13.1).
    to fireCannon
      make "p1x xcor
      make "p1y sum ycor 20
      tell "p1 [ tracer :p1x :p1y ]
      end
What this does is to put the coordinates of the tip of the triangle into
a couple of global variables, named p1x and p1y. The
turtle performing the fireCannon is the same one that receives the
key events and animates the triangle (the cannon). It then tells the
projectile-1 turtle ("p1") to invoke tracer with references
to the contents of these global variables.
The Target
Since I'm more concerned here with teaching you programming than anything else, I picked the first object that I thought of that would make a good target (easy to draw) - a flying saucer. And, since you've already animated both a triangle (the cannon) and a box (the projectile), I'm going to give you all of my code for the flying saucer.
Just for your information, the first thing I always do in the source code for my programs is to declare all global variables. By doing this, it is obvious to anyone reading my programs what global variables the programs contain. Following the global variables, I declare/create the additional turtles I am going to use. Here's the new code:
make "p1x 0  ;projectile 1's starting x postion
make "p1y 0  ;       and its starting y position

newturtle "fs [hideturtle]  ;flying saucer turtle

to black
  output 0
  end

to white
  output 7
  end

to drawSaucer
  setpensize 10 penup setpencolor black
  repeat 12 [forward 10 pendown forward 10 penup back 20 right 30]
  setpensize 14 pendown forward 50 back 100
  end

to advanceSaucer
  setpensize 42 setpencolor white back 2 forward 124 back 42
  drawSaucer
  end

to saucerJourney
  penup setxy -300 100 pendown setheading 90
  drawSaucer
  repeat 60 [ advanceSaucer wait 800 ]
  end
With this code, all you need to do is invoke saucerJourney and the saucer will traverse the graphics window. Try it out...
Hitting the Target
What we need to do now is figure out some way to determine when a projectile hits the saucer. There are many ways to do this. When I was originally writing my version of the program, I already had multiple projectiles working before I added a target. So, I decided to
- have the flying saucer update global variables identifying its current location
- have the projectile check this information to determine if it has hit the target after each move forward
- If the projectile has hit the target, it sets a global variable (hit) to true
- finally, the procedure that controls movement of the flying saucer checks hit before moving forward to see if it is now true, and if so, invokes splat and stops.
Got all that? If so, go and write the code. If not, keep reading, I'll go into the solution in a bit more detail.
A Detailed Look at my Version of the Program
Here's the structure of my program.
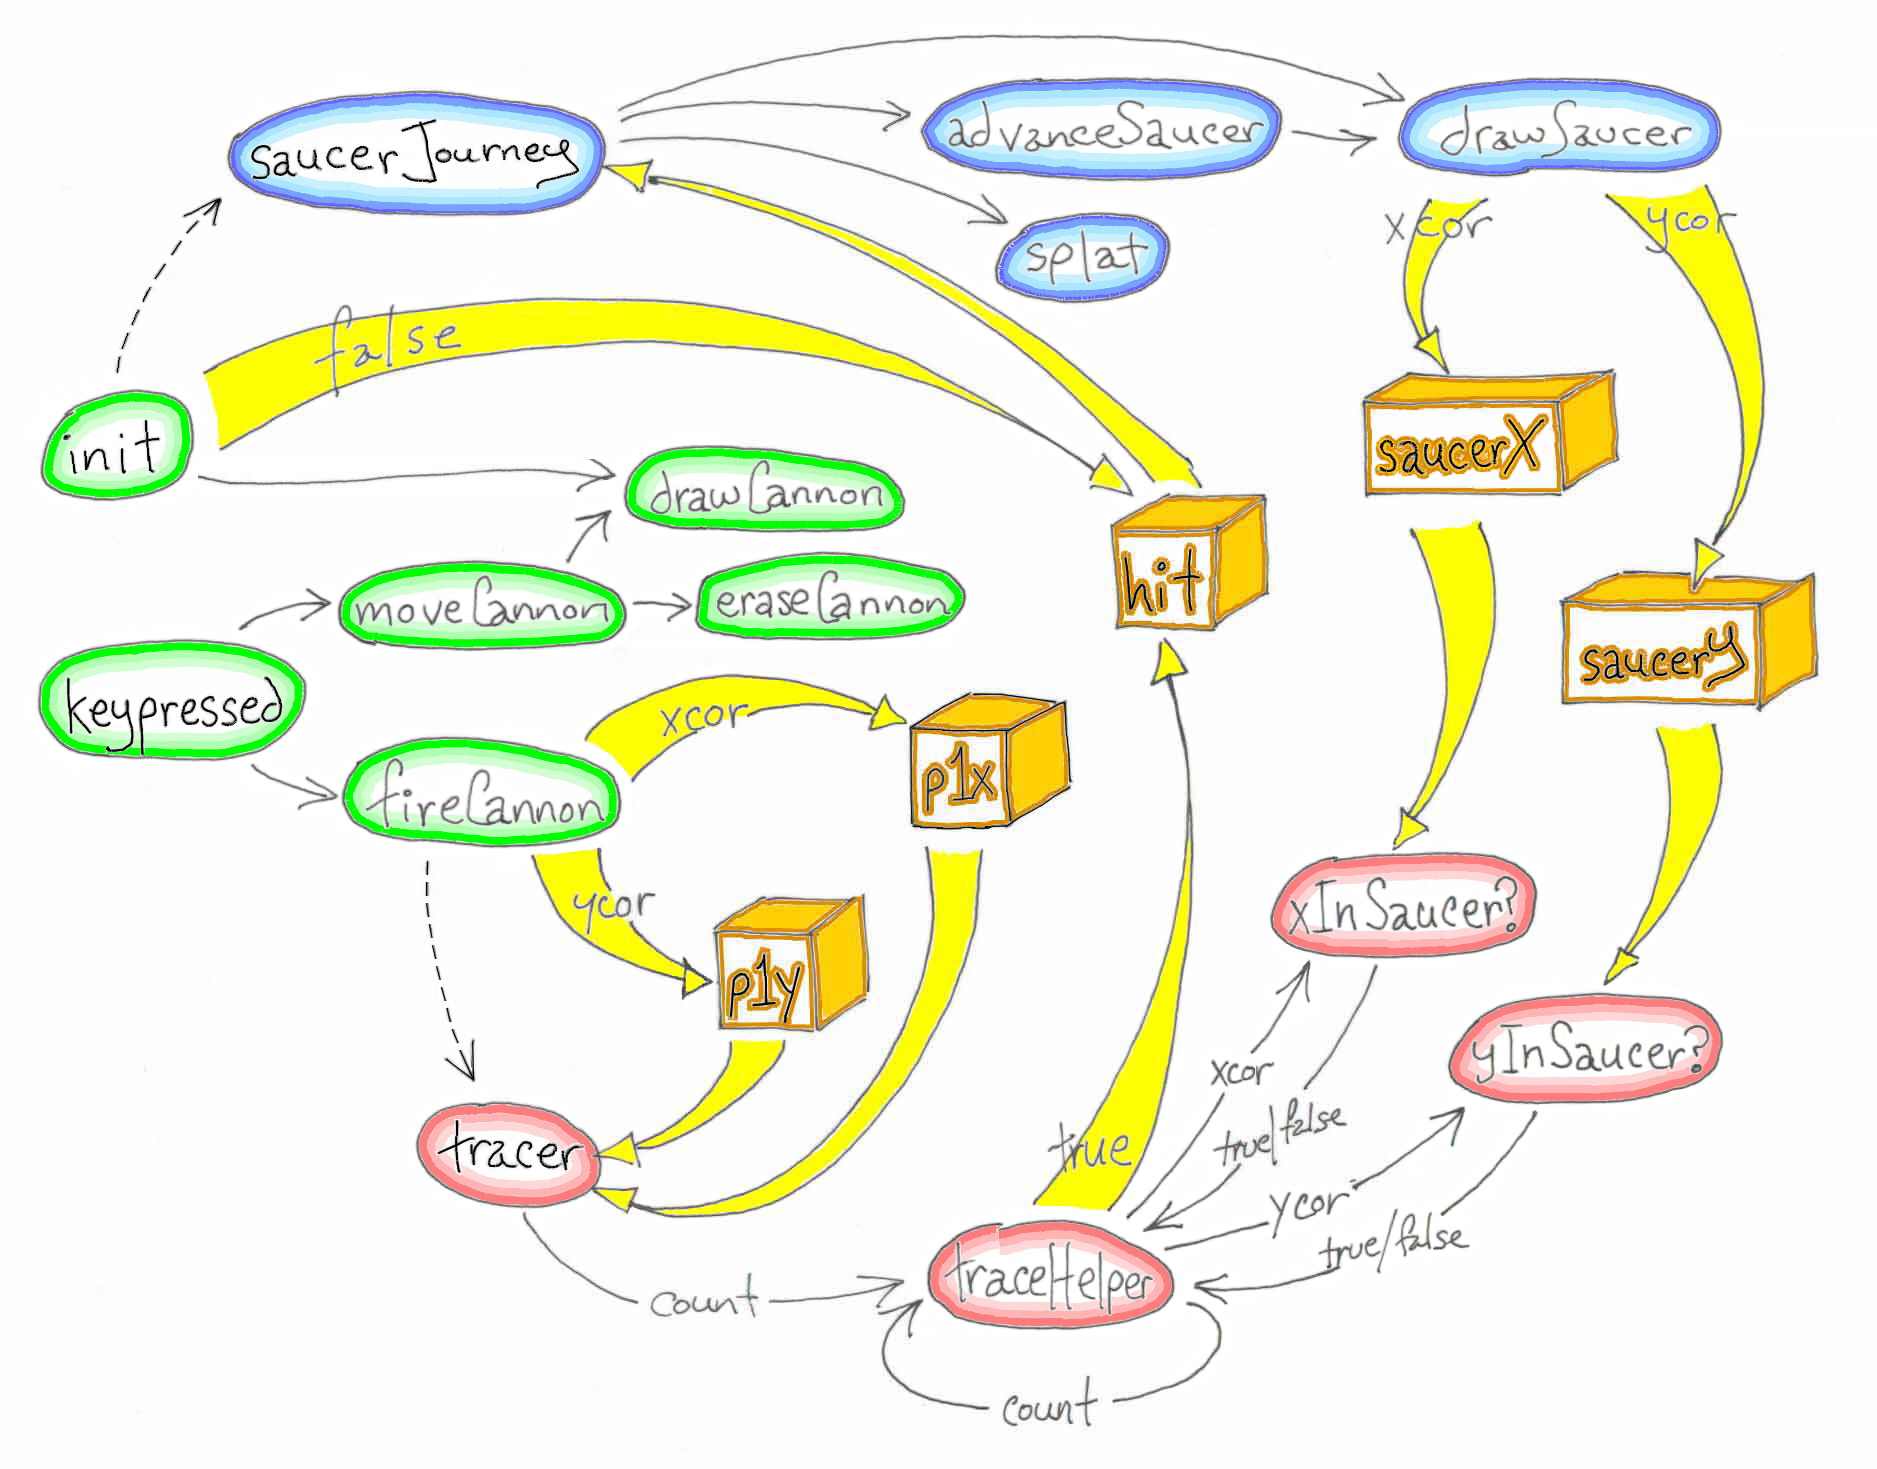
|
| Figure 13.1 |
Although it looks pretty simple, there is a lot of information in this diagram. You have everything here you need to write the program. If you are having trouble reading any of the labels in the diagram, click on it to get a full-sized version of it. Let me walk you through some of the parts/pieces.
First of all, I've put three kinds of things in the diagram. The global variables for the program are shown as boxes; there are five in the diagram labeled (left to right) p1y, p1x, hit, saucerX, and saucerY. The procedures that make up the program are drawn as labeled bubbles/clouds. I've colored the bubbles so that you can see which procedures are performed by the different turtles. Specifically, the green bubble procedures are performed by the initial turtle (t1). The blue bubble procedures are for the flying saucer turtle (fs) And, the red bubble procedures are for the projectile turtle (p1).
And then there are all of the arrows. The simple black line arrows show flow of control, i.e., procedure invocation. As with all of my programs that are GUI-based, I have a procedure named init which initializes everything. In this program, it just happens to use one of each type of arrow, so I'll use it to explain the arrows.
Checkout init; it has a solid black line arrow pointing at the bubble labeled drawCannon. This denotes init invoking drawCannon. Above this is a big yellow arrow pointing to the hit box. Flow of data into the global variables and accessing the contents of the data that is in them is shown with these big yellow arrows. In the arrow is the word false. So, in this case, init is storing false into the global variable named hit. Above the yellow line is a dashed black line pointing at the saucerJourney bubble. Dashed lines in the drawing indicate that a tell command was used to tell the destination to do something. In this case, init told the fs turtle to perform the saucerJourney procedure.
When init completes, the program just waits for some event. In this program, it waits for a key event, which will cause the keyPressed procedure to be performed.
There is one other arrow that I want to make sure you understand. Find traceHelper, a red bubble at the bottom. The arrow pointing to it (coming from tracer) has the word "count" in it. Count is an input expected by traceHelper. The arrow I want you to understand is the one that originates at the right hand side and loops around to point back at itself. This signifies that traceHelper is a recursive procedure - it invokes itself. Here is part of the its code, enough for you to see the flow of control.
    to traceHelper :count
      if equal? :count 0 [ stop ]
      ...
      traceHelper difference :count 1
      end
When tracer invokes traceHelper, it specifies a number of times it wants traceHelper to do what it does - move the projectile. So, think of traceHelper as the instructions-list in a repeat command.
A Detailed Look at Detecting a Hit
The global variable hit is used to signal that a projectile has struck the target. The procedure init sets it to the value false. The procedure saucerJourney accesses hit and if its value is true it invokes splat and stops. If you look at Figure 13.1 you will see that it is the procedure traceHelper that sets hit to true.
traceHelper is the procedure that animates a projectile. After the projectile is moved forward, traceHelper has the following if command.
if and xInSaucer? xcor yInSaucer? ycor [make "hit "true stop]
This if command combines the results of two procedures which return boolean results. If you need to review the and operator, I first covered it in the Built-in Operators For Combining/Manipulating Boolean Values section in the Predicates lesson.
Figure 13.1 shows this interaction. If you look at the traceHelper bubble, you'll see it's interaction with both xInSaucer? and yInSaucer?. The invocation of xInSaucer? consists of passing it the current X coordinate, which is what the xcor primitive returns, and getting back either true or false. The invocation of yInSaucer? is similar.
So, if the coordinates of the projectile are in the saucer, the projectile has collided with the flying saucer. So, what does the if command above do in this case? It sets the global variable hit to true. Figure 13.1 shows this as a big yellow arrow with true in it leading out of traceHelper and pointing to the hit box.
The next time the flying saucer turtle looks at hit (as it performs saucerJourney), it will see that it has been hit!
Getting More Than One Shot:
Multiple Projectiles
All right, let's add a few more projectiles - a few more turtles - to our arsenal. If you think about it, that's the reason why there's a projectile turtle named p1 and a "1" in the variable names p1X and p1Y. So, is adding another projectile as simple as creating a new turtle named p2, creating a couple more global variables: p2X and p2Y, and sprinkling more code everywhere we do something with projectile 1?
Not quite... Let's take another look at fireCannon. Here's a new version of it with new code that controls a second projectile, a copy of what we did with projectile 1.
    to fireCannon
      make "p1x xcor
      make "p1y sum ycor 20
      tell "p1 [ tracer :p1x :p1y ]
      make "p2x xcor
      make "p2y sum ycor 20
      tell "p2 [ tracer :p2x :p2y ]
      end
What's wrong with this new version of fireCannon?
Well, everytime that it's invoked, it tells both projectile turtles to perform tracer. We need to know if a projectile turtle is already doing something. If it is, it can't be given anything else to do until it's done. And, we only want one projectile turtle to perform tracer. If we tell p1 do it, that's it, we're done.
Time for a couple more global variables, i named mine p1Avl and p2Avl. They are used to determine whether or not a projectile turtle is available.
Here's the idea:
- in init you set their contents to true,
- in fireCannon we check to see if a projectile turtle is available before we try to use it; if it's available, we change the pnAvl variable to false (to indicate the projectile is in-use) and use tell to have its associated turtle invoke tracer.
-
the last thing that tracer does is to change the
projectile's pnAvl variable to true
to indicate it's once again available. But, this
means we need a seperate tracer for each projectile,
e.g.,
to tracer1 :xcor :ycor ... make "p1Avl "true end
Here's the start of the new fireCannon
    to fireCannon
      if :p1Avl [make "p1Avl "false make "p1x xcor make "p1y sum ycor 20 tell "p1 [tracer1 :p1x :p1y] stop]
That should do it. Add a few more projectiles to your program. Don't get too carried away, there is a limit to the number of turtles that the TurtleGraphics applet/application lets you create. I've chosen to give you 12 turtles - if you need more you'll need to get me to up this number...
Exercises
-
Extend the program to have more than one flying saucer trip.
Keep track of hits and speed up the flying saucer if it keeps
getting hit - to make hitting it harder.
NOTE: for performance reasons, you should include a cg or clean command as part of wrap-up of each flying saucer journey. This is an easy way to clean up the mess that splat makes. But, even if the flying saucer did not get hit, cg and clean free up a lot stuff the TurtleGraphics environment saves in case you re-size the graphics area.
An alternative is to turn off collection of graphics stuff with the norefresh command.
- Add a second flying saucer turtle so that multiple targets can be in the air at the same time. The flying saucers should go from left to right and right to left.
- Keep score. Count the number of hits and award points based on the level of difficulty of each hit. As the speed a flying saucer travels at increases, hitting it should be worth more points.
- Give the flying saucers projectiles of their own.
Summary
You learned how to create multiple turtles with the newturtle command and give them commands with the tell command. These commands by themselves are not hard.
The difficult part of the program we wrote was figuring out how the turtles should communicate. How does one turtle know where another turtle is, or in our case where an object being drawn by the turtle is? How do you make sure a turtle available/ready to do something you want it to do?
New jLogo Procedures Used In This Lesson
| Name | Input | Description |
| NEWTURTLE | name | Creates a new turtle with the specified name. |
| TALKTO | name | Directs future CommandCenter input to the specified turtle. |
| TELL | name instructionList |
Directs the specified turtle to perform an instructionList. |
In this lesson, you learned how to include symbols (words and sentences) into your programs. They can be displayed just like numbers. You learned how to join them to form bigger words or longer sentences.
Go to the Table of Contents
On to the next Lesson Arrays
