Background
jLogo Programming
- Commanding a Turtle
- Pseudocode
- Adding New Commands
- Iteration & Animation
- Hierarchical Structure
- Procedure Inputs
- Operators & Expressions
- Defining Operators
- Words & Sentences
- User Interface Events
- What If? (Predicates)
- Recursion
- Local Variables
- Global Variables
- Word/Sentence Iteration
- Mastermind Project
- Turtles As Actors
- Arrays
- File Input/Output
- AI: Pitcher Problem Solver
Java
- A Java Program
- What's a Class?
- Extending Existing Classes
- Types
- Turtle Graphics
- Control Flow
- User Interface Events
Appendices
- Jargon
- What Is TG?
- TG Directives
- jLogo Primitives
- TG Editor
- Java Tables
- Example Programs
- *** New ***:
Installation Notes
Updates
- December 13, 2008
- January 6, 2012
- March 15, 2013
- January 20, 2014
- February 13, 2014
- July 29, 2014
- January 18, 2016
- January 29, 2016
- August 19, 2016
Lastly
Words and Sentences
Introduction
In the previous lesson, we introduced defining your own operators. You now know how to write procedures that produce an output.
In this lesson, you will learn
- about new values, symbolic values, that you can have in your programs - words,
- a way to group words and/or numbers - sentences,
- the use of sentences to output multiple things from operators you define, and
- how to draw text (labels) of various sizes on the graphics canvas.
Lists of Words - Sentences
In Logo, a sentence literal is a list of words that can be included in a program by surrounding the words with square brackets. You have been using sentences since the repeat command was introduced in the iteration lesson. We've been supplying sentences composed of Logo instructions as its second input. As an example:
| repeat 4 [forward 100 right 90] |
Here are a few, more example sentences:
| [word1 word_2 word*3 word"4] |
| [orange 14] |
| [200 50] |
| [ ] |
The first example shows a Logo sentence that's just a list of four words. Note that Logo sentences do not have any grammatic structure and that the words in the sentence can include special characters not normally found in a spoken language's words.
The second example shows how we might use a sentence to represent an association, a color name followed by its Logo color number.
The third example shows a sentence that could be used to represent a point, an x,y pair of coordinates (More on this later in this lesson).
The fourth example show an empty sentence - a sentence composed of zero words. Although this seems to make no sense, empty sentences are important and will be covered in a future lesson.
An important feature of a sentence is that although it can be made up of many words, it is still only one thing. This is very important when a sentence is used as an input to a procedure. Figure 10.1 shows
- a sentence as an input to the println command,
- the same sentence as an input to the show command; notice that it includes, shows the square brackets in the CommandCenter,
- and finally, what happens when you attempt to invoke the println command with multiple things, two numbers.
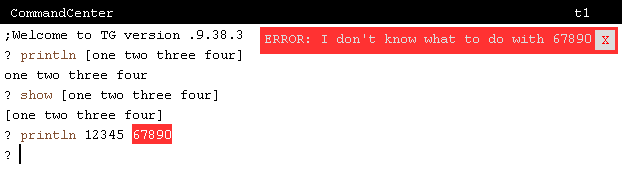 |
So, even though the sentence [one two three four] is composed of four words, println displays it properly. println expected one input and so it consumed one thing - a sentence. Alternatively, when I tried to give println two things, two numbers, the Logo interpreter complained because println only consumed one input. The Logo interpreter expected the second word to be the name of a procedure, a command starting a new instruction. In this case, 67890 is not a command, so it's an error.
Symbolic Values - Words
So far you have only been working with Logo instructions and numeric data. You have been using numbers for lots of things, e.g. the distance the turtle should move, a color number, a number of degrees to rotate the turtle, etc...
There is a lot more to programming than generating numbers and drawing stuff. Logo is a symbolic programming language, a decendent of LISP. Symbolic programming was created to help get computers to do human-like things - research in artificial intelligence.
We've just learned about literal sentences, lists of words, but how can you enter a single, literal word in Logo?
When the Logo interpreter is not collecting a sentence and it arrives at a double-quote character, i.e. ("), the collection process for characters composing the word starts. Characters are considered part of the word and collected until one of four things happens:
- a space is encountered,
- an open or close square bracket is encountered,
- a semicolon is encountered (the start of a comment), or
- the end of the current line is encountered.
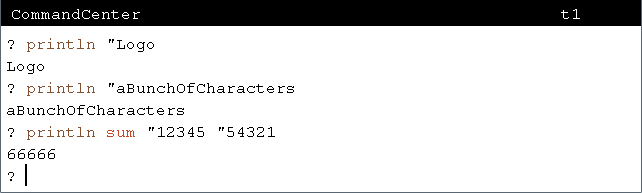
"Logo is a word made up of the characters: L, o, g, and o. Note that the double-quote introduces the word - it is not part of the word.
You can display words just like numbers. Figure 10.2 shows examples of printing words, note that numbers may also be entered as words. You can even do arithmetic operations on literal words as long as they are numbers.
 |
Sentences Can Be Used to Represent Compound Data
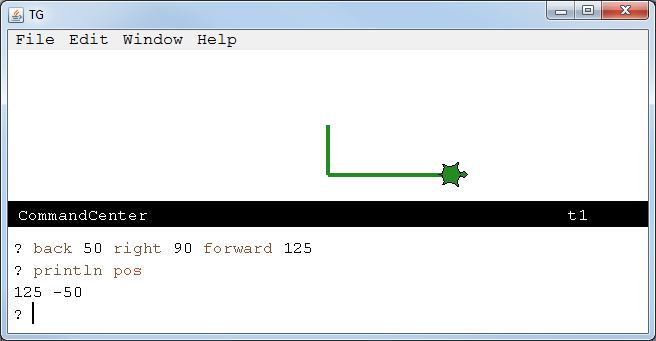
Sentences can be output from procedures when compound data makes sense. The example of a point above, [200 50], is useful as a way of representing a position in TurtleSpace. Table 10.1 introduces the pos operator.
| Operator | Description | |
| POS | Outputs the current coordinates of the turtle as a sentence. The X coordinate is the first word of the sentence; the Y coordinate is the second (and last) word of the sentence. | |
| |
||
Figure 10.3 demonstrates that pos outputs a sentence, two words, two numbers in this case.
 |
WORD and SENTENCE Operators
So what if you want to combine data, compute a sentence? Let's say you want to output a sentence in the CommandCenter along the lines of:
The turtle is at 125 -50
We've learned how to include literal sentences in our programs, by surrounding the words with square brackets. Figure 10.4 shows what happens when we try to combine a sentence and the pos operator by surrounding them with square brackets.
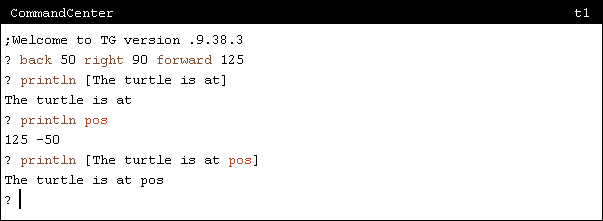 |
We have a problem; the word pos is not treated as an operator. it's treated simple as an ordinary word and included in the sentence.
Words and sentences can be assembled, but only using a couple of primitive Logo operators.
The Logo primitive operators for building words and sentences, also known as constructors, are the operators word and sentence, respectively. A word can be built out of multiple words; a sentence can be built by combining multiple words and/or sentences.
Table 10.2 introduces the new word and sentence operators we'll work with for the rest of this lesson.
| Operator | Inputs | Description |
| SE SENTENCE |
wordOrSentence1 wordOrSentence2 |
Outputs a sentence consisting of its first input concatenated with its second input. |
| (SE ...) (SENTENCE ...) |
... | Outputs a sentence whose inputs up to the closing parenthesis are concatenated. |
| WORD | word1 word2 | Outputs a word consisting of its first input concatenated with its second input. |
| (WORD ...) | ... | Outputs a word whose inputs up to the closing parenthesis are concatenated. |
| |
||
Figure 10.5 shows a few examples of uses of these operators. Notice how flexible the sentence operator is; it can be used to combine a word and a sentence or combine two sentences into one.
 |
But, also note that the word operator only combines two words into a single word. It's not as flexible as the sentence operator. You can't use word to combine a word and a sentence to form a new word, even if the sentence consists of a single word. Figure 10.6 shows what will happen if you try to do this.
 |
Here is the TG applet. Spend a little time playing with the word and sentence operators.
TG Programming Environment Applet
WORD and SENTENCE Expressions
A few lessons ago, you learned about combining operators forming expressions, and plumbing diagrams. All of the examples given involved numeric operations. Word and sentence operators can be chained together, mixed and matched, just like the mathematical operations. Here is an instruction that includes a chain of WORD operations.
|
Figure 10.7 shows a plumbing diagram of this instruction.
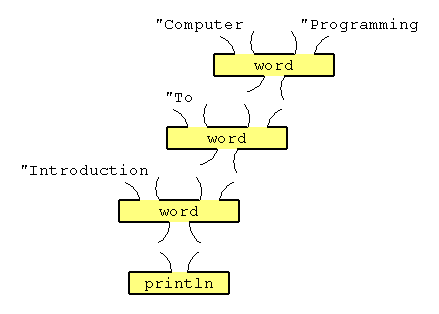 |
Type it into the TG applet above or the TG application running on your computer to see what it does.
Since, as mentioned above, numbers are just a special cases of words, computations can be part of the construction of words and sentences. Here is a procedure that takes two numbers as inputs and prints a sentence showing the addition of them.
|
Draw a plumbing diagram of the println instruction, the body of the procedure. Open up the Editor in TG and type in the definition of showAddTwoNumbers. Play with it; invoke it with different inputs in the CommandCenter. Does it do what you thought it would do?
TG's Logo interpreter can also accept a variable number of inputs for the word and sentence operators. You do this by surrounding the operator name and all of the inputs to it within parenthesis. This saves typing and makes the instruction easier to understand. Here is what the examples above look like when the variable number of inputs syntax is employed.
|
That's about it for an introduction to words and sentences. We'll look at them in more depth in the Word and Sentence Iteration lesson. But we have learned enough to use them in programs; time to see how.
SETPOS: Moving to a Point in TurtleSpace
As mentioned above, there is a primitive operator in Logo which output's the turtle's position as a sentence (pos); and, as you might expect, there is a primitive command that moves the turtle to a specified position. setpos moves the turtle to an absolute position specified by a sentence containing two numbers. The two numbers are a new horizontal (X) coordinate (the first word of the sentence) and a new vertical (Y) coordinate (the second/last word of the sentence).
| Command | Inputs | Description |
| SETPOS | sentence | Moves the turtle to an absolute position, specified by a sentence containing two numbers. The first number is a new horizontal (X) coordinate and second/last number is a new vertical (Y) coordinate. |
| |
||
Go back up to the TG applet and play with the setpos command. Open up the graphics window with the right mouse button, and use the sentence operator to construct inputs for setpos commands. Here is a cool instruction to try out.
|
Project: More Grid Expressions
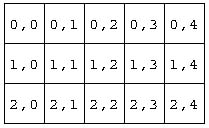
In the last lesson, in the rules I layed out for the Grid Toolkit, I mentioned that cells in the grid could be identified by their row and column numbers.
      A cell can be identified in one of two ways:
      1. by its row and column numbers. Rows are ordered from top to
	 bottom, with the top row numbered zero. Columns are ordered
	 left to right with the leftmost column numbered zero.

      ...
...
But in the code I gave you, I only provided procedures to move the turtle to a cell or draw a filled-in cell, with the cell identified by its index. I wanted to wait until after I introduced sentences to provide procedures which do things in a row,column manner.
So you now know how to construct sentences. Words and sentences can also be disassembled using a few primitive Logo operators. Logo has many operators for manipulating words and sentences, but let's initially limit ourselves to two of them: first and last . These operators are commonly referred to as selectors; they select pieces of words and sentences. I will cover the topic of word and sentence selectors more comprehensively in a future lesson.
| Operator | Inputs | Description |
| FIRST | wordOrSentence |
If the input is a word, its first character is output. If the input is a sentence, its first word is output. |
| LAST | wordOrSentence |
If the input is a word, its last character is output. If the input is a sentence, its last word is output. |
| |
||
Since we will be working with an input that is a sentence composed of the row and column numbers, we need a way to access each of them individually. The first operator will be used to get the row number and the last operator will be used to get the column number.
gridGoToRowColCell
Here is gridGotoRowColCell, the row and column (RowCol) input derivative of gridGotoCell.
|
gridGoToRowColCellCtr and gridRowColCellFill
I can't repeat enough how important symmetry is; it is a key aid in remembering groups of things. There are two other procedures which take an index as an input. We should provide RowCol counterparts for gridGotoCellCtr and gridCellFill.
|
Removing Redundant Code
By now, you should know how I feel about multiple copies of identical code in a program!
Well, take a look at Figure 10.8, a comparison of gridGotoCellCtr and gridGotoRowColCellCtr.
| to gridGotoCellCtr :idx | to gridGotoRowColCellCtr :rowCol |
| gridGotoCell :idx | gridGotoRowColCell :rowCol |
| setheading 90 forward gridHafCellSiz | setheading 90 forward gridHafCellSiz |
| left 90 forward gridHafCellSiz | left 90 forward gridHafCellSiz |
| end | end |
What is very interesting about these two procedures it that the RowCol version is almost identical to the index version. When I first wrote gridGotoRowColCellCtr and gridRowColCellFill, I just copied their index counterparts, changed their names, and changed the first line in their bodies. And, YES, as soon as I saw what I ended up with, I decided to remove the redundant code.
First, I created a couple of empty helper procedures.
|
Then, I copied & pasted duplicate code into them.
|
Finally, I replaced the copied code with invocations to the helper procedures. Here is all the code - the results.
|
Hopefully you will agree that this code is easier to read/understand and have a bit more confidence that it does what we want. And, once again, the less code that makes up our Grid Toolkit, the less chance we have mad a mistake in it.
Maintaining the Grid Toolkit's Contract
Note: It appears as if I have broken the the Grid Toolkit contract. Remember the rule:
All procedures in the toolkit will have names starting with "grid"
Well, what I meant the rule to be is:
    All procedures in the toolkit will have names starting with "grid,"
    except for procedures only intended to be invoked inside the toolkit
The helper procedures I added are only for use by other Grid Toolkit code. As an example, fillCellHelper is only to be used by gridCellFill and gridRowColCellFill. And the same limitation applies to gotoCellCtrHelper.
Drawing Text on the Graphics Canvas
The turtle knows how to write. You have seen how to include text in your programs and to manipulate it - putting pieces together, taking them apart. The results of our operations have been displayed in the CommandCenter. What about drawing characters, words, and sentences on the graphics canvas?
There are three built-in commands and one built-in operator related to drawing text on the canvas. The label command draws a textual representation of its input on the canvas. The base of the text is the turtle's current Y position and the turtle's X position is where the drawing starts.
Two commands, setlabelfont and setlabelheight, are used to change the appearance of the text drawn. The setlabelfont command is used to change the face of the characters that are drawn. The setlabelheight command is used to change the size of the characters drawn.
The labelwidth operator, as its name implies, outputs how far the text extends to the right of the turtle's position. This is handy when you want to center text or move the turtle just past one label to draw more text.
| Command | Inputs | Description | |||||||||||||||||||||||||||||||||||||||
| LABEL | datum |
The text representing LABEL's input is drawn on the graphics canvas. |
|||||||||||||||||||||||||||||||||||||||
| LABELWIDTH | datum | The width of the textual representation of the input, in the current font face is output. | |||||||||||||||||||||||||||||||||||||||
| SETLABELFONT SETLF |
number |
Sets the font face and style of characters drawn with the LABEL procedure.
|
|||||||||||||||||||||||||||||||||||||||
| SETLABELHEIGHT SETLH |
number |
The height of capital letters drawn with the LABEL procedure is set to the input. |
|||||||||||||||||||||||||||||||||||||||
| |
|||||||||||||||||||||||||||||||||||||||||
Go back up to the TG applet and play with these procedures a bit...
Revisiting Characters As Numbers
Ok, one last thing to complete this lesson about text and and ways to play with it in Logo. You now know about words; words can be included in your programs simply by prefixing them with a double quote character ("). Words can also be built using the word operator. You know about sentences; they can be included in your programs by enclosing the words that the sentence consists of within square brackets ('[' and ']'). There is also the sentence operator to combine things into a sentence.
Words are composed of characters, a single character word can either be thought of as a word or a character. In the first lesson, I introduced you to the concept: "stuff in a computer is just bunches of bits, really just numbers." In the "Symbols as Bits - ASCII Characters" section of that lesson, I introduced the ASCII standard as a ubiquitous way of mapping numbers to characters. So, a final thing to cover in this lesson is how Logo lets you convert between numbers and characters.
| Operator | Inputs | Description |
| ASCII | character | Outputs the integer (between 0 and 127) that represents the character in the ASCII standard code. |
| CHAR | number | outputs a single character word that is the ASCII code corresponding to the input (an integer between 1 and 127). |
| |
||
So, given any number in the integer range 1..127, the ascii operator will get you the character the number represents. Or, vice versa, given a single character word, the char operator outputs its numeric equivilent. Figure 10.9 shows some example usages.
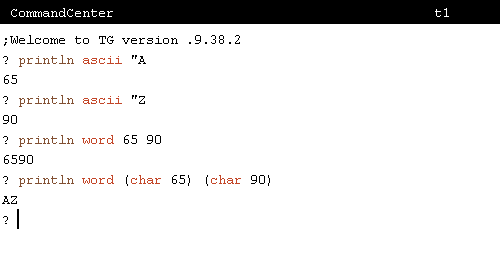 |
Checkout the last two instructions in Figure 10.9 closely. Notice how numbers are considered multiple character words in one case but with the help of char can be reduced to a single character.
Go back up to the TG applet and play with the ascii and char operators a bit to get a better feel for what they can do and what they can't do.
Practice: Random Words in Random Spots
Ok, here's a little exercise that will get you some experience using some of the procedures introduced in this lesson.
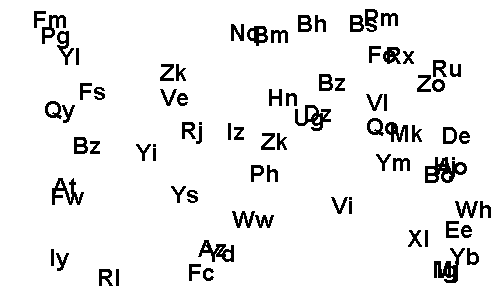
The challenge for you is to write a program that draws nonsense words made up of two random letters, the first an uppercase character and the second a lowercase character. Use label to draw the word on the graphics canvas. Make sure you use procedures introduced in this lesson where you can, e.g., use setpos to move the turtle instead of using setxy. Figure 10.10 shows what the graphics canvas looked like after my version of the program drew 50 random two-letter words.
Hint: the randomInRange procedure we wrote in the previous lesson helps out a lot!
 |
Ok, I just couldn't resist... figure 10.11 shows random words, drawn with random fonts, in random colors, with varied heights.
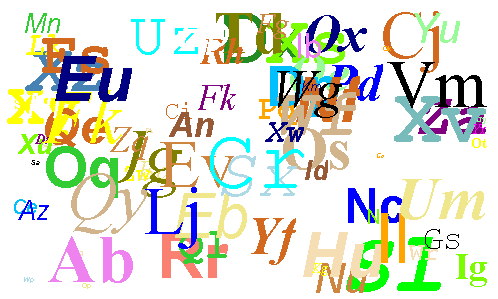 |
One More Grid Toolkit Extension
And, lastly, now that we have a way of drawing characters on the graphics canvas, let's add a couple new commands to our Grid Toolkit.
I'll give you the helper procedure and it is your job to write the procedures that use it. Here's the code; read through it... Do you understand the code?
|
Well... well... well... There's a new jLogo primitive operator in the code that you haven't seen yet. LABELWIDTH outputs how wide whatever its input will be if it is drawn onto the graphics canvas with the LABEL command. I used it to center the character horizontally within a grid cell.
Ok, it's your turn; write two new procedures:
|
Practice: Simple Grid Extension
If you have the TG programming environment on your computer, follow this link to the source code for our new GridToolkit and copy & paste the source code into TG's Editor so that you can play with it. If you want to use the TG applet on this web page to play, use the "loadcode GridToolkit_10.jlogo" directive in the CommandCenter to get the source code in the Editor. Make sure the Editor is open before you type in the loadcode directive.
Then extend it to put random characters in the cells with gridRowColCellLabel. Figure 10.12 shows a grid my program generated. I also made the labels (characters) random colors.
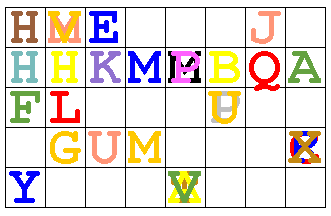 |
Summary
In this lesson, you learned:
- that characters are numbers and numbers can be characters
- about words (symbols) which are composed of characters
- how words can be combined to form sentences
- why and how you might include sentences in your programs - as compound data
- how to present text on the graphics canvas
Go to the Table of Contents
On to User Interface Events
