Background
Logo Programming
- Commanding a Turtle
- Pseudocode
- Adding New Commands
- Iteration & Animation
- Hierarchical Structure
- Procedure Inputs
- Operators & Expressions
- Defining Operators
- Words & Sentences
- User Interface Events
- What If? (Predicates)
- Recursion
- Local Variables
- Global Variables
- Word/Sentence Iteration
- Mastermind Project
- Turtles As Actors
- Arrays
- File Input/Output
- AI: Pitcher Problem Solver
Java
- A Java Program
- What's a Class?
- Extending Existing Classes
- Types
- Turtle Graphics
- Control Flow
- User Interface Events
Appendices
- Jargon
- What Is TG?
- TG Directives
- jLogo Primitives
- TG Editor
- Java Tables
- Example Programs
- *** New ***:
Installation Notes
Updates
- December 13, 2008
- March 7, 2009
- January 6, 2012
- March 15, 2013
- January 20, 2014
- February 13, 2014
- July 29, 2014
- January 18, 2016
- January 29, 2016
- August 19, 2016
Lastly
Pseudocode
Hindi translation thanks to Nathan Zed.
Urdu translation thanks to Samuel Badree.
Introduction
For getting the turtle to draw simple things, like a box, you can just enter Logo instructions in TG's CommandCenter and most of the time your program just works. It does what you wanted it to, what you thought it would do. However, when you write any non-trivial program, this will rarely be the case. The more instructions you include in your programs, the more you need to keep in your head, in your working memory, about what you're doing. The more instructions, the more typing you will do; so, the more chances or a typo. And finally, the more instructions, the more chances to make a mistake.
In this lesson you will learn how to write computer programs in steps.
The first step will be to just think about what you need to do.
In the next step you will write what you want the program to do in pseudocode.
    Pseudocode (derived from pseudo and code) is a description
    of a computer programming algorithm that uses the structural
    conventions of programming languages, but omits detailed
    subroutines or language-specific syntax.  ( WikipediA )

    ...written in a pseudo-code that resembles a computer language but
    avoids excessive detail by lapsing from time to time into ordinary
    English. This lets us specify quite a bit of the program before we
    have worked out all aspects of it.  On larger programs, it is
    valuable to begin with pseudo-code and refine it in stages until
    it is all executable.  This way you can revise and improve the
    design at a high level without writing any executable code, yet
    remain close to a form which can be made executable.
				  (Software Tools, Kernighan, Plauger)
A third step is the conversion of the pseudocode into properly formed instructions that are available in the programming language you are using, Logo in our case.
How To Write Non-Trivial Programs
That Do What You Want
When you did the exercises at the end of the last lesson, my guess is that you didn't type in programs that worked perfectly the first time. If you did, congratulations... you are great at visualization and orderly thought. The good news is that anyone can learn to write correct programs - an experienced programmer would have no problem writing "correct" programs for these exercises.
Why?
An experienced programmer would think about how to solve the problem before she would start typing in instructions. An experienced programmer would break the problem into pieces that each are simple to do by themselves. Then, put all the pieces together to solve the problem. In computer science this is a process that's called "stepwise refinement." You break the problem down into steps and then refine what each step does.
Let's play "experienced programmer" with the first exercise from the previous lesson.
Understanding the Problem
What you should do first is think about what you need to do. Get out some paper and a pencil to write down your thoughts. Look at the diagram carefully.
Try drawing the boxes.
How did you do it? How can you break up the drawing, reduce its complexity?

You need to get the turtle to:
- draw thirteen line segments (six horizontal and seven vertical). Start at a corner and just walk the turtle around, forward, backward, right turn, left turn, until all the line segments are painted. - OR -
- draw four rectangles
- one is tall and thin
- three are short and form a stack of rectangles on the right side of the first
- OR -
- draw seven lines (four horizontal and three vertical)
- four lines form the perimeter of a big rectangle
- one line splits this rectangle in half vertically
- two lines split the right half of the rectangle into three, equally sized rectangles
Can you think of any other ways to break down and describe what the turtle needs to be instructed to do?
Ok. This completes the "Understanding the Problem" phase, now on to planning.
Devising a Plan
      The most important mental tool for coping with complexity
      is abstraction.  Therefore, a complex problem should not be
      regarded immediately in terms of computer instructions...

		 (On the Composition of Well-Structured Programs,
		  Nicklaus Wirth, Computing Surveys, Dec., 1974)
So you now have some sketches and notes on a piece of paper that describe ways that lead to a solution. The next step is to decide on an approach and put together instructions, a process, a procedure, which gets the turtle to draw the figure.
Let's follow our experienced programmer's thoughts through the rest of a solution. She has chosen to draw a square (a special kind of rectangle) and subdivide it.
Her first step: figure out how many turtle steps each side of the square should be. Since it will be split in half and into thirds, she wants a length that is a multiple of two and three. She likes nice round numbers so she makes each side of the square 120 turtle steps (120/2=60; 120/3=40). As you can see, it's nice to know a little bit of math when you're programming a computer.
Most beginning programmers would not have thought about the size as a first step. So if this caught you by surprise, no big deal. You would have found out that it is important when you were further along. But it is important for you to know the level of detail that an experienced programmer considers, that you will eventually think about when you write big programs.
With this decided, the experienced programmer first writes her program down on paper in pseudocode.
   1. draw a square
   2. draw the vertical line that splits the square in half
   3. draw the top horizontal line spliting the right half
   4. draw the bottom horizontal line spliting the right half
   5. make the turtle invisible
Pseudocode is jargon for describing something in your native language. Her pseudocode is English descriptions of what she wants her program to do. Once this is complete and she is convinced that her plan should produce what she wants, it's time for the next phase: converting the pseudocode into Logo instructions.
Carrying Out the Plan
Time to convert the plan into a program that can be executed on a computer. Since she is programming in Logo, our expert programmer will convert the pseudocode into instructions available in this computer language. Table 3.1 shows both the pseudocode and the results of its conversion into Logo.
| Pseudocode (Written on Paper) |
Logo Instructions (Typed on Computer) |
|---|---|
| draw a square | fd 120 rt 90 fd 120 rt 90 fd 120 rt 90 fd 120 |
| draw the vertical line that splits the square in half | bk 60 rt 90 fd 120 |
| draw the top horizontal line spliting the right half | bk 40 rt 90 fd 60 bk 60 lt 90 |
| draw the bottom horizontal line spliting the right half | bk 40 rt 90 fd 60 |
| make the turtle invisible | ht |
| |
|
Our experienced programmer brings up the TG Applet in a browser on her computer. TG understands a dialect of the Logo programming language; it contains a Logo interpreter.
She reads her pseudocode notes and converts them into Logo instructions in her head and types the instructions into the CommandCenter. As each line is [Enter]-ed she watches the turtle do exactly what she expected.
Looking Back
Finally, our experienced programmer reviews what she has done. In this case she examines the graphics, asking herself Does the graphics my program produced match the drawing I set out to produce? In other words, is her program correct?
Looking at her instructions, her (source code, reflecting on her choice of approach, she asks herself Did I make the right choice of approach? If I were to write the program again, would I do it the same way? What was the hardest part? Is there a way I could have made it simpler?
Lastly, she will think about the code, comparing it in her mind with other similar programs she has written. She will ask herself Is a pattern developing? Can any of the source code she has written be used in the future, to make a similar program easier?
Our experienced programmer is consolidating her knowledge of writing programs in Logo. This will help her in the future.
Using TG's Editor
Instead of Paper
It is possible to switch from pencil and paper to the TG applet for the "Devising a Plan" and "Carrying Out the Plan" steps.
I was taught to write my programs on paper first 44 years ago. But, my interaction with a computer consisted of getting a little bit of time on a computer I shared with a hundred other programmers. So, use of paper and a pencil for writing programs was important. But, now everyone has their own computer... Let's move on to take advantage of this and eliminate the use of paper and pencil for this step. NOTE: paper and pencil is still the best approach for Understanding the Problem; at least that's my opinion.
You will do this with TG's Editor.
Opening TG's Editor
As of version .9.36.6 of TG there is a simple way to open the Editor, the editor directive. Simply type "editor" or the abbreviation "edit" into the CommandCenter on a line all by itself.
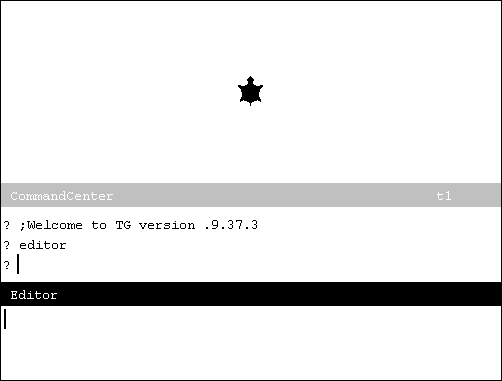 Figure 3.1
In older versions of TG, the Editor is opened with the Window->Editor->Open menu item. In the TG application, the menu system is readily available using the standard, pull-down stripe across the top. To access the menu system in the TG applet, position the mouse in the applet and hold down the right mouse button. Position the mouse over the "Window" menu item to bring up its submenu, choose the "Editor" submenu, and finally choose its "Open" option. Figure 3.2 shows this.
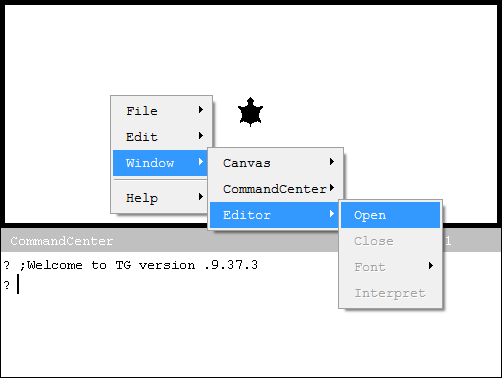 Figure 3.2
Either way, an Editor subwindow will appear below the CommandCenter, at the bottom of the applet.
At this point, the height of the subwindows can be adjusted by positioning the mouse's icon over one of the name stripes, holding down the left mouse button, and dragging the name stripe up or down. Since we are going to be using the Editor, make it a bit taller; first drag the CommandCenter name stripe up, then drag the Editor name stripe up.
Entering Comments Into TG's Editor
For "Devising a Plan" we need to enter the pseudocode representation of the program. Well, this is a problem. a Logo interpreter doesn't understand pseudocode and it will complain if we type it in. We solve this problem by entering the pseudocode as comments. Comments in Logo start with the semicolon (";") character and go through the end of the line. Comments are intended to be read by humans and are ignored by a Logo interpreter.
 Figure 3.3
Figure 3.3 shows the TG applet after the pseudocode from the previous exercise has been entered into the Editor.
Saving the Contents of the Editor
What if at this point, you need to go somewhere or do something else?
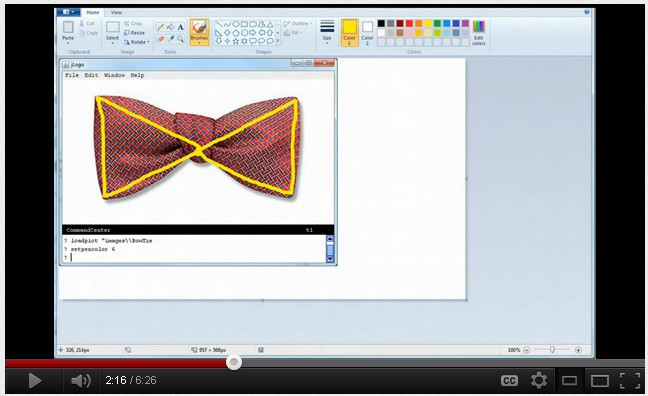
If you are using the TG programming environment on this this web page there is nothing you can do other than copy what is on the display onto paper to take with you. But if you have the TG programming environmnet on your computer you can save the contents of the Editor to a file on your computer. Select the File->Save as... menu item. Figure 3.4 shows this. To install TG on your computer, see Appendix H Installation of TG.
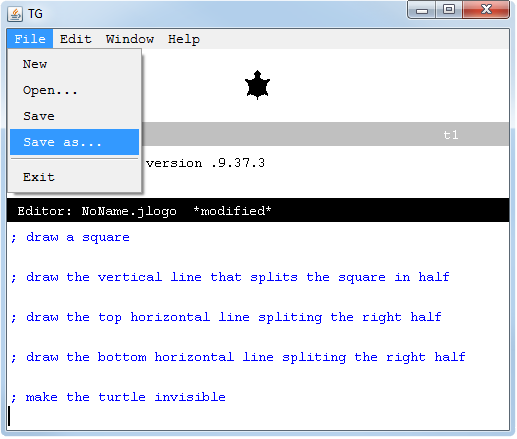 Figure 3.4
At this point a window will pop-up for you to choose a directory and supply a file name to save the contents of the Editor to. What this window looks like and how you interact with it is different on different computers, e.g., a Microsoft Windows desktop vs an Apple MacBook. Once the save is complete you can quit TG. When you want to continue working on your program, start TG and select the File->Open... menu item. A system dependent window will pop-up and you can use it to find and select the program you saved before. TG's Editor will open with the selected file's contents in it.
Entering Logo Instructions Into the Editor
So, we are now ready for the "Carrying Out the Plan" step. Under each comment, we convert the pseudocode into the appropriate Logo instructions.
Figure 3.5 shows the TG applet after the Logo instructions have been added.
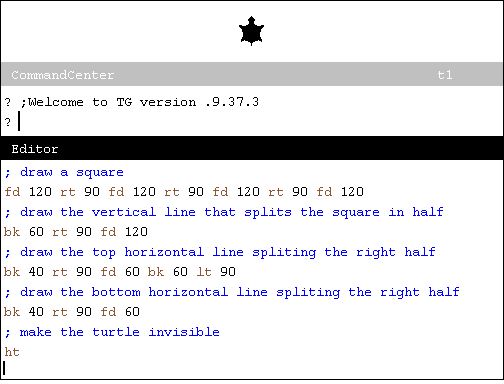 Figure 3.5
Getting TG to Perform the Contents of the Editor
So, unlike when we entered Logo instructions into the CommandCenter, nothing has been happening while we entered stuff in the Editor. How do we get the Logo interpreter to perform the instructions we've typed into the Editor?
The easiest way is to transfer focus out of the Editor. You may have noticed by now that the subwindow of TG you are interacting with, the one that has focus, is highlighted in black (as opposed to gray). Click the mouse in the CommandCenter or in the graphics canvas. This transfers focus to whichever subwindow you clicked in. If you are using the TG application, instead of the applet, you can use the [Ctrl]-[Tab] or the [Shift]-[Tab] key combinations to move focus from one of TG's subwindows to another.
Anytime you transfer focus from the Editor to another subwindow and the contents of the editor has been changed, the contents of the Editor is processed by TG's Logo interpreter. In the case of our example, the turtle will draw the boxes.
You can also use the Window->Editor->Interpret menu item. Figure 3.6 shows me doing this.
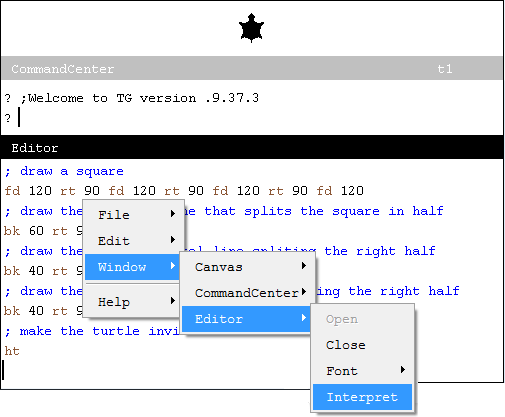 Figure 3.6
And finally, Figure 3.7 show the results, our set of boxes drawn exactly as expected...
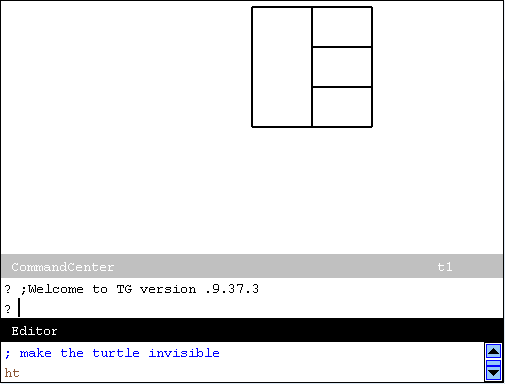 Figure 3.7
THROTTLING Graphics Aids Debugging
The performance of modern computers is so great that most of the time when your programs draw in the graphics canvas, it's just poof... the complete picture appears. When you are not getting what you thought you instructed the turtle to do or if you just want to watch the turtle perform the graphics, you can use the THROTTLE command.
THROTTLE is followed by a number, the milliseconds (1/1000s of a second) that you want the turtle to rest for after performing some graphics instructions. So, to get the turtle to pause for half a second, you enter a "throttle 500" command. When TG's interpreter performs your program, you will be able to watch the turtle move around, doing what it has been instructed to do.
*NOTE* THROTTLE only works when the turtle is visible. So, make sure that if you include a HIDETURTLE instruction in your program, it should be after all graphics instructions.
Throttling can be turned off with either a "throttle 0" instruction or the nothrottle command.
Practice: More Divided Boxes
Extend the program we just completed a walkthrough of.&bnbsp; Further divide the bottom-right box into four boxes. Figure 3.8 shows what's desired.
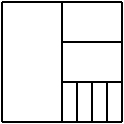 Figure 3.8
If you are using the TG application, here is the base source code you can copy/paste into TG's Editor.
TG Applet (loadcode)
If you would rather use the TG applet below, first choose the File->New option in the menu system to open the Editor (or if it is already open this will clear its contents) and then type loadcode DividedBoxes into the CommandCenter. This will insert the source code into the Editor where you can extend it.
Practice: Draw a House
Try this new approach. Write a program that draws the simple house shown in Figure 3.9. Go through all of the steps presented:
|
Although it's not the most attractive house, it is easy to draw with the turtle. Make the front of the house a box with each side 100 turtle steps. Make the roof an equilateral triangle, with each side 100 turtle steps. Make the door 50 turtle steps high and 25 turtle steps wide. Make the window a square, 25 turtle steps on each side. |
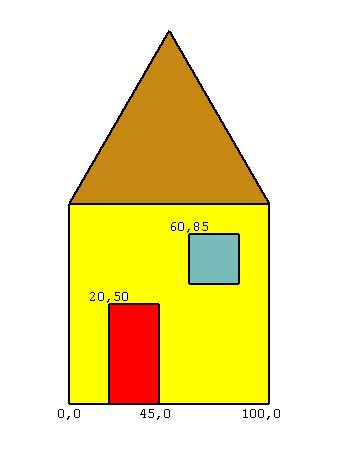
First, write pseudocode for how you will get the turtle to draw the house and then convert this into Logo instructions. If you prefer paper and pencil, do it this way. If you prefer to type stuff into TG's Editor, here's the applet.
TG Programming Environment Applet
Summary
One BIG thing we learned in this lesson was how to write a program in phases:
    1. Understanding the Problem
    2. Devising a Plan
    3. Carrying Out the Plan
    3. Looking Back
These are George Polya's four steps for solving mathematical problems. Dr. Polya wrote an excellent book named How to Solve It which explains his methodology.
Things to Think About
- Did you notice that TG's Editor knows the difference between comments and Logo instructions? What did it do to help you see which were which?
- The house in Figure 3.9 is not simply a line drawing; it has its pieces colored in. Explore Appendix D (Primitive Procedures) to find the command that I used to accomplish this. Play with it...
Go to the Table of Contents
On to Adding New Commands
